Up next in 10

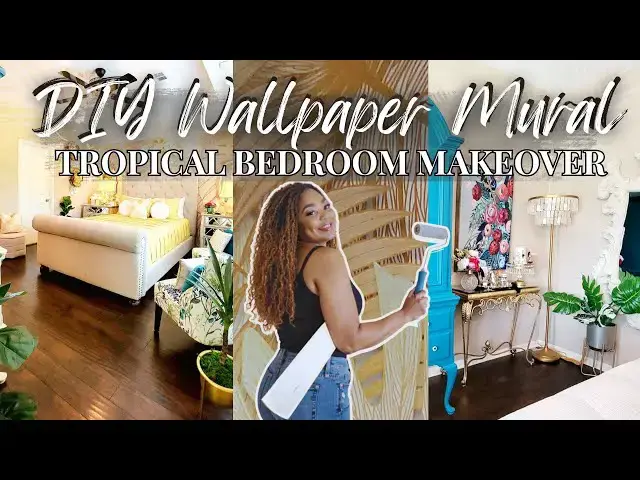
Wake Up In Paradise 🏝🍹 | DIY Wallpaper Mural | Tropical Bedroom Makeover
Jul 10, 2025
Welcome to my DIY tropical bedroom transformation featuring a bold wallpaper mural accent wall, luxe details, resort energy and a major comeback story.
This isn’t just a makeover… it’s a lesson in resilience, luxury interior design hacks, and budget glam. From a mural mishap to a full-on tropical retreat, I’m walking you through the full process: wallpaper installation (twice! ), crown molding magic, DIY thrifted statement pieces, and all the little styling moments that makes this room feel like a peaceful escape.
Read the full blog post here (MORE LINKS BELOW)
https://lanidoesit.com/how-a-tropical-mural-transformed-my-bedroom-into-a-luxury-oasis
DIY Painted Armoire Supplies & Details: https://lanidoesit.com/painting-my-first-armoire-teal/
0:00 Intro
0:14 The Vision: Tropical Luxe Oasis On A Budget | Mural Accent Wall
0:40 The Bedroom Before | 50 Shades of Beige
0:57 Shopping For Wallpaper Mural
1:34 Everything You’ll Need
1:51 Prepping The Walls & Installation
3:13 Mural Meltdown Moment
3:45 Before Choosing A Mural Instead Of Wallpaper
5:18 Round 2: Gluing Over It And Moving On
7:07 Closing The Gap That Haunted Me
7:16 DIY Crown Molding + Corbel Install
Show More Show Less View Video Transcript
0:02
Hey y'all. I'm Cat Tani from
0:04
lonnieit.com where DIY magic meets luxe
0:07
looks on a budget. If you love stylish
0:09
home vibes that don't break the bank,
0:11
you're in the right place. And if you're
0:13
like me and been praying for better
0:15
sleep, more peace, and mornings that
0:17
feel like an tropical oasis, but without
0:19
the passport, this is it. Watch me turn
0:22
my 50 Shades of Beige bedroom into a
0:25
silk mural. Tropical paradise, thrifted,
0:27
glam, and all. Did it go smoothly?
0:30
Absolutely not. But worth it, 1,000%.
0:34
Stick around for the drama, the lessons,
0:36
and the final glow up, and hopefully
0:38
you'll get some ideas for your bedroom
0:39
along the way. Let's get into it,
0:41
starting with this before tour of my
0:43
bedroom and all its 50 shades of beige.
0:46
It's calm yet pretty and boring at the
0:48
same time. Even pops of color couldn't
0:51
fix that eerie back wall. So, I said
0:54
wallpaper accent wall or nothing at all.
0:57
Funny thing, I actually swore off
0:59
wallpaper after my laundry room
1:00
meltdown. But here I go again. No pill
1:03
and stick this time. I found this
1:05
tropical mural on Etsy, then found it
1:07
for even cheaper on Amazon. Goodbye
1:09
overpriced boutiques. This gold tropical
1:12
wallpaper mural has excellent reviews.
1:14
It's a really good thick, durable,
1:16
waterproof material and affordable for
1:18
the one wall around $69. I contacted
1:22
Amazon and was told I'd need two rolls.
1:25
This design coordinates really well with
1:26
my existing color palette of teal,
1:29
amber, mustard, and a few other pops of
1:31
colors. So, here's what I got for my
1:33
mural glow up. Heavy duty adhesive, a
1:35
foam roller, smoothing tool, a sharp
1:37
blade, a ladder, rags, and floor
1:40
protection because blue will happen. A
1:42
spray bottle is optional. I'll explain
1:44
that later. I also grabbed this
1:45
wallpaper kit on Amazon to save money
1:47
and everything's included. First thing I
1:49
need to do is remove the electric outlet
1:50
covers from the wall and any nails. And
1:52
then I'm dusting the wall with the
1:54
microfiber dusters so that the wall will
1:56
be as smooth and as clean as possible
1:58
because don't nobody want no lumpy mural
2:00
accent wall cramping our style. You can
2:03
see here each strip is numbered. Yay.
2:05
I'll be gluing each strip on the wall
2:07
starting from the top left moving to the
2:09
right. The first panel went up easy,
2:11
hence no pattern to match. The second it
2:15
took some patience, y'all. climbing that
2:17
ladder with a huge strip, then lining up
2:18
the design while smoothing it out flat
2:20
by hand to make sure it sticks while
2:23
lining it up with the previous strip
2:25
while continuing to smooth it out before
2:26
trimming the bottom. I didn't die
2:28
though. I didn't die.
2:31
[Music]
2:54
As I'm getting closer to the middle, I
2:56
notice the gap at the top is getting
2:58
bigger, but the mural is aligned
3:00
perfectly. So, the first thing that
3:02
comes to my mind is my wall or house
3:04
must be crooked. Now, I have to figure
3:05
out what to do about this, y'all.
3:07
5 hours later,
3:08
I made it all the way to the end. Yay.
3:10
And I only have one more strip left.
3:13
Well, friends, that excitement was
3:15
short-lived because none of the second
3:17
roll matches my pattern. I contacted
3:19
Amazon who reached out to the seller
3:21
this time. And yep, the seller
3:23
confirmed. This roll does not repeat. I
3:26
can't finish the wall. The only fix?
3:29
Start completely over with another mural
3:31
that is not even available right now.
3:33
I'm devastated and feeling defeated over
3:36
and over. Friends, listen. And don't say
3:38
I didn't tell you, but please note these
3:40
10 extremely important things to know
3:42
before choosing a mural instead of
3:43
wallpaper. One, murals don't repeat
3:46
patterns. Unlike traditional wallpaper,
3:48
murals are one big sticker. Two, your
3:52
wall must be as even as possible, even
3:54
if your measurements are perfect, and
3:55
uneven wall or ceiling can cause small
3:57
gaps or misalignments. Can I get a
4:00
witness? Three, measure twice and buy
4:03
with a margin. Four, textured walls.
4:06
Test first. A smoother wall will always
4:08
yield a cleaner finish. Five, material
4:10
matters. The the mural I used is made of
4:13
silk and is waterproof, which makes it
4:16
more durable and forgiving during
4:18
installation. Always check the material
4:20
before buying to know how it'll perform
4:22
and how it'll feel. Six. Installation
4:25
method is different. Mine wasn't pill
4:27
and stick, so I used wateroluble glue
4:29
and a foam roller. It's slightly messier
4:32
process than pill and stick, but the
4:34
finish is smoother and more seamless.
4:36
Seven, check for trim or finishing
4:39
needs. If your ceiling or baseboards
4:41
aren't perfectly straight like mine
4:43
were, be prepared to trim the mural or
4:46
finish it off with something like
4:47
decorative crown molding to hide any
4:50
gaps or shifts. Having an extra set of
4:52
hands could help. This type of mural is
4:54
best applied with help, especially for
4:55
taller walls. And 10. Prep the wall like
4:58
a pro. Clean the wall thoroughly and
5:00
make sure it's dry. Avoid installing
5:02
over any residue of sudge. A clean,
5:05
primed wall will help the glue adhere
5:07
properly and extend the mural's life. I
5:09
hope these reminders save you from the
5:11
heartache and bodyaches that I had to
5:13
endure. Most of all, make it fun.
5:16
The correct mural finally arrived and at
5:19
no cost to me. Here's a quick look. Yep,
5:22
still got that sad little gap. I was so
5:25
sore the next day for almost a week last
5:27
time that I almost paid someone $800 to
5:29
redo this one wall. But I said, "Nope."
5:32
I tested a small piece of mural glued
5:34
over another strip and let it dry
5:36
overnight. And guess what? It worked. No
5:38
sanding, no mess. Just me pulling off my
5:41
long- aaited DIY redemption, y'all. So
5:43
that I don't physically suffer again,
5:45
I'm stretching right before and taking a
5:47
few stretch breaks. Plus, I got my Red
5:49
Bull to hype me up this time around.
5:52
I'm not kidding. And now that I know how
5:54
sticky this glue can get, I'm also
5:56
wearing the same clothes as last time.
5:58
Here we go again. My strips are laid out
6:00
and I'm using leftover adhesive I had
6:02
left in the plastic bag, although
6:04
another tub is still needed. As I'm
6:06
attaching the first strip, the only
6:08
difference I'm noticing is the new mural
6:10
pattern is the same, but just a little
6:12
larger or wider. So, the shadow behind
6:14
the new mural won't make a difference.
6:16
By the way, liking, sharing, or
6:18
commenting on my video helps me out a
6:20
lot. Thanks so much for sticking around
6:22
this far. The best is yet to come. Now,
6:24
let's get this mural upright this time.
6:27
[Music]
6:38
Look at me. I'm so glad that I didn't
6:40
pay that $800 to have this done again.
6:42
And I'm so relieved to finally be done
6:44
with this wall, y'all. I made it to the
6:47
end of the last strip for the second
6:49
time. And I didn't die.
6:59
I'm in love with my new mural accent
7:01
wall. Although my excitement is dampered
7:04
by this gap at the top of my apparently
7:06
uneven wall still hunting me. So, my
7:08
solution, crown molding. Let me tell you
7:11
how this gap turned into a glow-up
7:13
moment. I was highly annoyed about these
7:15
walls being uneven and just plain rude.
7:17
But what felt like a design disaster
7:19
turned out to be a divine evolution. I
7:22
slapped on some 3-in inexpensive pilling
7:24
stick crown molding. Then grabbed two
7:27
just about 6-in fancy corbells and hid
7:29
them with Gorilla gel glue like a pro,
7:32
allowing them to securely bond overnight
7:34
with some painters tape. When I stepped
7:37
back the next day to check out my mural
7:39
wall,
7:41
budget, bougie, built-in period. Now,
7:45
this wall looks elegant, expensive, and
7:47
completely unbothered, just like me. The
7:50
crown molding is super easy to apply,
7:52
just pill and stick, and I can already
7:53
tell it's made to last for a long time.
7:56
And there was only a little bit less to
7:57
cut off on each end with a blade flushed
7:59
with the corbells.
8:01
Check it out, y'all. The corbells and
8:03
crown molding combined is giving my
8:05
mural accent wall a boost of elegance.
8:07
Now, that's a budget bougie fix for you.
8:10
And yes,
8:13
it now looks built in, custom, and
8:15
finally dramafree.
8:18
Now that my new mural accent wall is
8:20
done, it's time for my favorite part,
8:22
the decorating and styling. Yay. If you
8:26
don't have a color palette in mind, no
8:28
worries. All you need to remember is
8:30
that a great tropical palette pulls from
8:33
nature. Think blush greens, ocean blues,
8:36
warm yellows, golden sunlight, and a
8:39
splash of coral or pinks for fun. You
8:42
can layer these in with your walls,
8:44
bedding, plants, and florals, or even
8:46
just your accessories. And definitely
8:49
don't sleep on texture, materials like
8:52
rattan, bamboo, or warm woods, which
8:54
instantly bring that island vibe home. I
8:57
mentioned my color palette earlier, and
8:59
now you'll see how it all came together.
9:01
Starting with this lovely artwork from
9:03
HomeGoods that hangs near the
9:04
nightstands.
9:06
In a room this size, small nightstands
9:08
just wouldn't cut it. I went with these
9:10
large mirrored chests from the store at
9:13
home for $150 each. This was when I
9:16
first bought my home, and let me tell
9:18
you, they were worth every penny. Bigger
9:20
nightstands help balance out a tall bed
9:23
like mine and make the whole room feel
9:25
more luxurious. Plus, the mirrored
9:27
design bounces light around, adds glam,
9:29
and makes the space feel brighter and
9:31
more expensive without even trying. I've
9:34
had these tall scallop mirrors from
9:36
Hobby Lobby, just $40 with a coupon. I'm
9:39
using painters tape to mark the same
9:41
spot on each nightstand and the wall,
9:43
which makes hanging them stole away
9:45
easier for me. But if you got a better
9:47
trick, drop it in the comments. To avoid
9:50
drilling into my wallpaper, I'm testing
9:51
out 3M claw hangers with picture wire
9:54
who claims small holes, big hold.
9:57
Fingers crossed.
10:06
Did y'all hear that? The claw has fell
10:09
out the wall. I'm not sure if these are
10:12
fit for silk wallpaper over drywall. Not
10:14
to mention, they were a struggle to
10:16
punch into the wall per their
10:17
advertisements and videos. I decided to
10:20
put Gorilla Glue on the back of the
10:22
claw, and I applied three heavyweight
10:25
command strips behind each mirror
10:27
because they hold 20 well, they hold up
10:30
to 20 lbs each, and I wanted triple the
10:33
guarantee. And just as I thought, the
10:35
command strips work exactly as
10:37
described. And they were struggle-free.
10:40
And now my mirrors are giving height and
10:42
drama on my mural accent wall along with
10:45
the DIY crown molding and the corbells.
10:47
It's giving architectural luxury on a
10:49
budget. While I finish styling my
10:51
nightstands, before we move on to the
10:53
rest of the room, I just want to note
10:55
that tropical decor and design doesn't
10:58
have to mean tiki bar vibes. I layered
11:00
in just the right amount of accent
11:02
pieces to keep things chic and balanced.
11:05
Gold metal florals and the wall add
11:08
texture and elegance, while small and
11:10
mediumbased arrangements bring in
11:12
tropical color without overwhelming the
11:14
space. If you're a minimalist, focus on
11:17
one standout floral or metallic moment.
11:21
For my maximalist babe, layer textures,
11:24
heights, and pops of color, but keep it
11:26
in within your palette. And this look
11:28
proves you can go tropical and still be
11:31
tasteful. For example, with tropical
11:34
bedroom lighting, warm layered lighting
11:36
is key to a cozy island atmosphere. My
11:39
nightstand lamps softly illuminate the
11:41
nightstands, and a unique floor lamp
11:43
adds extra glow in the corner. Look for
11:46
warm tone bulbs and fixtures that feel
11:48
organic or soft glam. Adding seating
11:51
near a window or floor lamp invites
11:53
relaxation and or reading. I already had
11:56
these two floral accent chairs from Ross
11:59
that complements my tropical color
12:00
palette and brings more nature indoors.
12:03
When choosing seating, consider a rotan
12:06
bench, a pattern armchair, or a woven
12:09
poof to expand your tropical lounge
12:10
area. If space is an issue for seating,
12:14
consider multi-use or storage stools.
12:17
Then add accent pillows on top to make
12:19
them look more appealing. If you're
12:20
still here right now, thank you so much,
12:22
new friends. I truly appreciate your
12:25
support. Let me know in the comments
12:26
what you like most about this video or
12:29
what would you change. I definitely
12:31
appreciate your feedback. Now, the long
12:33
awaited windows and I want curtains in 7
12:36
minutes or less. So, I'm using no
12:39
bracket curtain holders from Amazon for
12:41
around $15. They clip right onto your
12:44
existing blinds. No drilling needed.
12:46
Just pop them on, tighten, slide in the
12:49
curtain rod, hang the curtains. Done.
12:51
Just how I like it. No drill curtain
12:53
brackets come in tons of styles, so I
12:56
know there's one made for you, too,
12:57
friend. I've linked everything in the
12:59
description, and even more details are
13:01
available on my website. Since I've got
13:03
two tall, narrow windows, I'm using one
13:06
long curtain rod and four panels instead
13:08
of two rods. I hadn't planned on styling
13:11
these windows actually until I found
13:12
these gold metallic palm leaf curtains
13:15
with an ivory background. Stunning,
13:18
right? These tropical curtains instantly
13:21
soften the space and echo the mural with
13:23
their breezy gold palm pattern. The way
13:25
they catch the light is giving Luxe
13:27
Island Resort without overwhelming the
13:30
room. No tropical space is complete
13:33
without plants, real or artificial. Real
13:35
plants bring peace, purify the air, and
13:38
thrive in bright spaces. But artificial,
13:40
they give you the same lush look with
13:42
zero upkeep. I layer it in faux
13:45
monsteras, palms, and fiddle leaf to add
13:47
softness, height, and that tropical
13:50
vibe. But if you've got the sunlight,
13:52
girl, go ahead and flex those real
13:54
tropical plants. Most of them thrive in
13:57
bright light anyway. But if your
13:58
bedrooms a little light shy like mine,
14:01
these faux beauty still bring that vibe.
14:03
No watering, no guilt, all glam. Then to
14:06
fill the empty walls, I shopped at
14:08
stores like Ross and Burlington for
14:10
metallic yet elegant floral metal
14:12
sculptures. Because in this room,
14:14
flowers don't just sit in vases, they
14:16
bloom on the walls, too. These large
14:19
metal wall flowers run between $13 and
14:22
$30 at Burlington and Ross. Unlike at
14:25
Amazon or Wayfair, they're often double
14:27
this price, but much smaller. To carry
14:30
the theme upward, I upgraded this large
14:32
scale floral sculpture to go above my
14:34
bed, blinging it out with pearls, faux
14:37
diamonds, and gold leaf that I had left
14:39
over from a Halloween project. And then
14:41
I zip tied the sculpture on the back of
14:43
this beige iron scroll base that I
14:46
already had in above my bed. You could
14:48
see it early on in the video. Because
14:50
without the new bling and elevation, it
14:53
looks so washed out against my mural.
14:56
Now, it's bold, it's glam, and totally
14:58
one-of-a-kind focal point along with the
15:00
mural. This is the sculpture before, and
15:03
this is the after. To think I listed
15:05
this scroll on Facebook Marketplace for
15:07
sale, I quickly deleted that listing.
15:10
Now that my mural wall is giving full
15:12
tropical glam, wait until you see what's
15:15
happening on the other side. It's a
15:17
whole vibe, y'all. I thrifted some
15:19
budget pieces and turned them into
15:21
luxury moments like this DIY armor I
15:23
painted into treat with a gold leaf
15:26
blowup. It's actually the focal point of
15:28
the whole room. And yep, I've got one
15:30
when I walk in and when I walk out.
15:32
Spoiled much.
15:35
The tutorial for this arm is in the
15:37
description, by the way. My second DIY
15:39
statement piece is this black metal
15:41
console table with a wooden top, which I
15:43
thrifted for $35. I gold leaf the entire
15:46
table and swapped the wooden top with an
15:48
inexpensive custom beveled mirror from
15:50
Amazon. And now it's giving glam perfume
15:54
console for all of my favorite scents. I
15:56
got this heavy iron table with a wooden
15:58
top from the Goodwill for $5. I painted
16:02
the top in the same ivory white I used
16:04
on my painted Tahesian treat armwire and
16:07
I covered the center with this luxury
16:08
textured metallic wallpaper from from
16:11
Amazon. Actually, it's the perfect size
16:13
for my small seating area. This stunning
16:16
oversized ornate mirror instantly
16:19
doubles the glam for my tropical bedroom
16:21
vision. I painted it ivory to match my
16:23
armwire. And now it reflects all the
16:26
light, the mural, and that luxe resort
16:28
energy right from the moment I walk in
16:31
and when I open my eyes every morning.
16:34
Thank you so much for watching and
16:35
sticking with me, my friend. Welcome to
16:37
my tropical oasis. Let's take a tour so
16:40
you can see how it all came together.
16:43
This wasn't just a makeover. It was a
16:46
lesson in patience, faith, and proof
16:48
that luxury and peace can exist on a
16:51
budget. I hope this inspires you to
16:53
create your your own version of peace.
16:56
Whether it's a full-blown tropical oasis
16:58
or just a cozy corner that makes you
17:01
exhale often out of joy and
17:03
appreciation. Because waking up to joy,
17:06
softness, and beauty should never feel
17:09
out of reach. If you felt that, hit that
17:12
like, drop a comment, and share this
17:14
with someone else who needs a glow up in
17:16
their space and their spirit. I'm beyond
17:19
blessed to wake up to this, and even
17:21
more grateful that you're here to share
17:22
this transformation with me. Until next
17:25
time, stay inspired and never stop
17:27
building the life you deserve.
17:32
Can
17:35
we start right here?
17:36
I know you'll know that we'll both go
17:38
slow. Recharge right now. So emotional.
17:42
[Music]
17:45
You stop right there.
17:46
Getting higher. Getting higher as the
17:48
sun gets low. Hold me close till we lose
#Bed & Bath
#Home & Interior Decor
#Bedroom